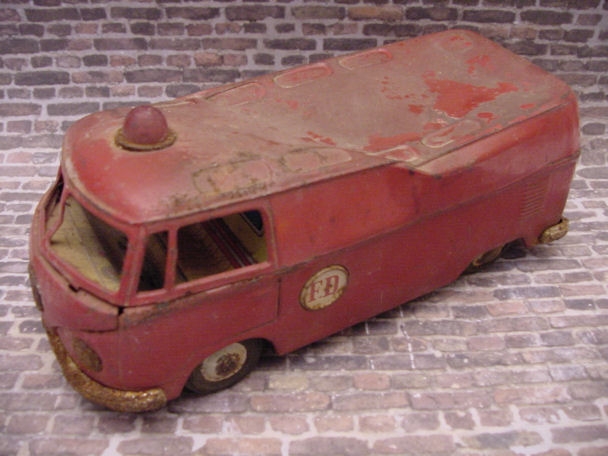
This BANDAI Fire Department Bus was found in a barn and had been parked there for some time, after surviving some heavy duty play time and weather conditions. This type of VW Panel Bus itself, in excellent condition, is very collectable, especially with the Fire Department theme, nice detailing lines and check out those roof windows on a panel Bus. Now looking at this rusty crusty BANDAI beater Bus with the smashed in roof, oxidized paint, dirt, rust, no need to go on, why and where do you start. Actually, the best thing the Bus has going for itself is that it is complete, not missing any parts and I had the vision of making it an ADAC autobahn vehicle conversion. I was contemplating getting a tetanus shot in case I get some rusty cuts during the project but decided to just get going, taking things apart.
The VW Bus is built in three tin sections, lower/chassis, roof and front clip. Using a spring hook and going through the windows and wheel wells, the connecting tabs were bent open and the top was removed from the lower section. WOW, did I ever open up a hornet’s nest and was very surprised to discover what was inside – just that – a pair of hornet’s nests. I guess you could call them VW Bugs when they were around and fortunately, they had left the nest some time ago. Once the top was off, the roof light, front clip, lithographed interior, rear wheel assembly, paper resonator and friction motor was removed. The tin pieces such as the 3 round FD emblems, headlights, “W” emblem, bumpers and rear license plate was also removed. Now the process of smoothing out the dents, paint striping, cleaning and figuring out what is the best way to handle the condition of some of the parts. For example, the tin nickel-plated bumpers were rusty and pitted and could not be polished so they would have to be filled and painted.
Using a special plastic hand tool and wood block, the dents were smoothed out and the tin body was paint striped and wire brushed. The 3 round emblems, hubcaps, and bumpers were also striped cleaned. All the tin parts were then primered for final color painting. The white, black and yellow painting for the body tin was applied in several stages masking off the different color sections. It takes several days to complete the painting process since the different color sections need to dry over night. Using a computer graphics program, I made the ADAC graphics and then printed them using special water transfer decal paper and a laser printer. The decals were applied and then all the painted parts were clear coated.
The friction motor was cleaned and oiled and the original paper resonator was used as a pattern to make a new resonator. I also decided to make some red taillights for the VW Bus using some brass brads. An orange roof light was found and would be better suited for the ADAC theme instead of the red original light. Although the Bus was left in the barn under the weather conditions, the tin lithograph interior was still in good condition and cleaned up very nice with a cleaner wax. Now the Bus was ready for final assembly. Starting with the lower/chassis section, the wheel assembly, paper resonator, friction motor, bumpers, headlights, “W” insignia, taillights and rear license plate were carefully attached. The front clip and tin lithograph interior were attached next to the lower/chassis section. The orange light and metal bezel were then attached to the roof section. The roof section was then mated to the lower/chassis section being careful lining up the metal tabs and bending them over with a wooden stick and not damaging the paint. OK, now the project is completed and the BANDAI ADAC Restor-Version Bus shines in all its glory.


